- Back to Home »
- Operating System , Softwares , Tech Updates »
- Download And Install Android-x86 4.0-r1 (ICS-x86) On Your PC Or Laptop.
Posted by : alvi3e
Friday, 5 July 2013
Used In Smart Phone. Now You Can Install It
On Your Desktop Or Laptop. Before Telling Installation Process Please Download The Lates Version Of Andriod For PC From Bellow Option Given.
On Your Desktop Or Laptop. Before Telling Installation Process Please Download The Lates Version Of Andriod For PC From Bellow Option Given.
 Lets Get Started:
1) Download UNetbootin From Here.
2)Install It On Your Pc.
3)Then Insert A Pen Drive On USB Port.
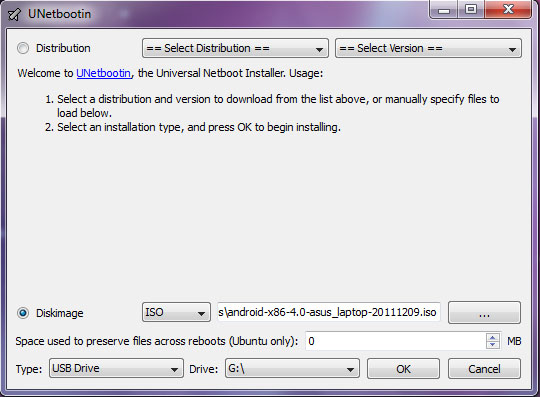
4)Open UNetbootin, Choose Diskimage, Select The Android-x86 ISO file, And Select Your Target USB Drive.
5)Click OK. Then UNetbootin Will Create Your Pen Drive To A Bootable Live USB.
6)After UNetbootin Is Done, Insert Another Pen Drive (or SD card/external hard drive if you wish to install it there)
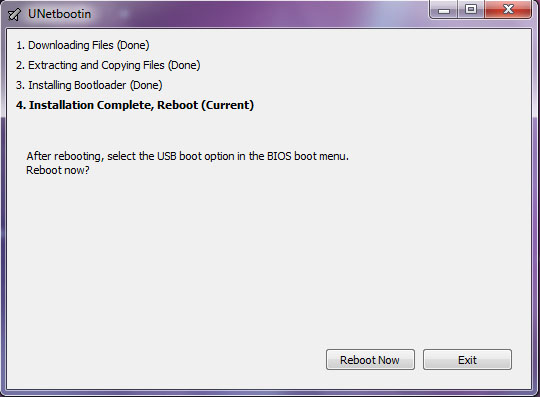
7)Click Reboot Now To Restart Computer.
8) While Starting Computer, Press Appropriate Keyboard
Button (Mine Is F2 But May Vary Depending On Laptop Manufacturer) To Get To BIOS
Boot Menu And Select USB Drives To Boot First Before HDD Or CD/DVD Rom. Save And
Exit.
9) Your Computer Will Restart Again And Boot Your Android X86 Thumb Drive. Select Install Android-X86 To Hard Disk.
10) When You In Choose Partition Page, Select Your Target Thumb Drive (Usually In Sdc1) To Install.
11) Format Your Thumb Drive As NTFS.
12) Select Yes To Install Boot Loader GRUB.
13) Select Yes To Install /System Directory As Read-Write.
14) If Asked You To Create User Data Image, Make It 512MB (You Can Customize The Value If You Want).
 15) After The Installation Completed, Choose Create A
Fake SD Card. Creating A Fake SD Card Enables Extra Features In Android Such
As Gallery, Music Player, Etc. I Make It 2047MB, You Can Lower The Value If You
Want.
15) After The Installation Completed, Choose Create A
Fake SD Card. Creating A Fake SD Card Enables Extra Features In Android Such
As Gallery, Music Player, Etc. I Make It 2047MB, You Can Lower The Value If You
Want.16) When It Is Done, Remove Your Bootable Live USB Thumb Drive And Hit Reboot And Enter BIOS Boot Menu Again And Make Sure The Android Thumb Drive Is In First Boot Order.
17) You Have Done It! The Android X86 4.0 Ice Cream Sandwich Is Installed In Your Thumb Drive And Ready To Rock!
Everything Is Working Fine In My Computer Including A Working Wireless Network.
You Can Install Android On SD Card Or External Hard Disk By Following The Steps
Above. The Procedure Is Same.


And Install Android-X86 4.0-R1 (Ics-X86) On Your Pc Or Laptop. >>>>> Download Now
ReplyDelete>>>>> Download Full
And Install Android-X86 4.0-R1 (Ics-X86) On Your Pc Or Laptop. >>>>> Download LINK
>>>>> Download Now
And Install Android-X86 4.0-R1 (Ics-X86) On Your Pc Or Laptop. >>>>> Download Full
>>>>> Download LINK